Technical Library
Multi Core Coding in Dalvik
Next we go into a bit more detail of how you can develop Android apps for the Dalvik runtime environment in a way that means that the performance of your app is not locked to that of a single core. It also has an attached example Android application showing off some (most?) of these components. Some familiarity with multi-threaded software development is assumed.
Although some multi-core devices have shipped running earlier versions of Android, "Honeycomb" is the first release officially supporting operation on multi-core devices. The example has been created to require a minimum API level of 12, corresponding to version 3.1 of the Android SDK, as this is actually required by some of the features used.
Multi-threading in Dalvik
Going at least back to Android 1.6 (Donut), threads could be created within the Dalvik VM using standard Java semantics, and they would execute in individual operating system threads. However, because Android was only supported on single-core devices, the software would never be exposed to actual concurrency. With Android Honeycomb, apps can actually make use of all of the cores in the device, increasing the amount of available processing power not only by updating to a newer processor, but multiplying this with multiple processing units. At the same time, system overhead such as handling interrupts, processing communications protocols and rendering the user interface remain a constant for the system—freeing up even more power.
Well, there is no such thing as a free lunch: some concurrency problems can only occur, or occur much more frequently, when you have applications where threads are executing concurrently on different cores and interacting in strange ways. This means that some explicitly multi-threaded applications that have worked flawlessly on previous versions of Android could start having problems if they have bugs in their synchronization design. On the other hand, existing multi-threaded applications that have been correctly written may suddenly see a performance improvement from being able to process different tasks in parallel.
Responsiveness
The key thing to realize about multi-threaded programming for Dalvik is that only the main (user interface) thread can update the user interface. You can offload calculations, media decoding or processing with software filters onto other threads, but in the end it is the UI thread that needs to display the result on the screen. However, the UI thread is what connects your app to the user, so unless you want your applications to be rated as "sluggish" or "unresponsive" you want to make really sure to do as little as possible on it. In fact, if you perform operations taking several seconds to complete, Android will present the user with an "Application Not Responding" (ANR) dialog, asking whether the app should be terminated. A more detailed explanation is provided in Google's official guide to designing for responsiveness.
For example, if you perform some small network operation in your app, this might not cause any noticeable slowdown when you try it locally. However, your app may later be used by someone in a different geographical location, perhaps with a slow Internet connection—and the user interface will freeze completely while the app waits for the communication to complete. At best, this will only be a little bit annoying to the user—at worst, it will cause Android to pop up the ANR. To further discourage this specific bad practice, API level 11 and above now throws a new exception—NetworkOnMainThreadException. Fortunately, Android does provide several methods and tools to get around this.
Memory usage
Of course, performing more work in parallel usually means that you will be consuming more memory. Even though modern mobile devices can have 1GB or more of RAM, Android enforces a strict policy of maximum memory usage. If you go above this limit (which can vary between devices, but tends to be at least 16MB) you will trigger a java.lang.outOfMemoryError exception. Try to stay on the comfortable side of your maximum limit.
Available tools
Java threads
If you have previous experience of multi-threaded Java development, most of the basic tools are still available to you in the Dalvik environment—starting with java.util.concurrent and java.lang.Thread. You can either extend the Thread class or implement the Runnable interface, and then run as many manually managed threads as you like and the system can carry.
If you want a thread that is spawned at process creation time to be available in a worker pool to process tasks as ordered, or to perform some continuous background task, this is how you do it. However, you will need to implement some form of message passing to and from the UI thread—for example by using android.os.Message and android.os.Handler. This was my instinctive approach for showing off multi-threading when I originally started planning this post, but I found that AsyncTask (described below) was often the simplest way to quickly push a task onto a background worker thread.
AsyncTask
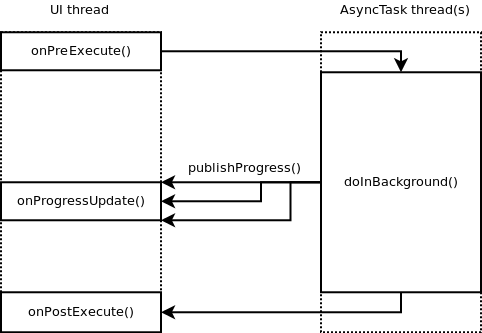
The AsyncTask class can be easily extended to run a task on a background thread from the UI thread without any need to implement explicit message passing or perform manual execution management/synchronization. To summarize, the subclass can overload up to four functions:
onPreExecute()—runs on UI thread. Sets up things for background processing.
doInBackground()—runs on background thread. Performs the background task, optionally calling publishProgress() from time to time. Receives input parameter passed to execute() function.
onProgressUpdate()—runs on UI thread, invoked for each publishProgress() call from background thread.
onPostExecute()—runs on UI thread, receiving the return value from doInBackground() as an input.

The task is launched by calling the .execute() member function, which runs the task on the system default Executor. The two Executors provided as default are the SERIAL_EXECUTOR, which executes each background task from start to finish in order, and THREAD_POOL_EXECUTOR, which executes several background tasks in parallel on a pool of threads.
Although THREAD_POOL_EXECUTOR has been the default executor since Donut, the current Dalvik API documentation for AsyncTask states that Google intend to change this to SERIAL_EXECUTOR from the Ice Cream Sandwich release onwards. This move is presumably to reduce the risk of incorrectly written apps falling over when presented with actual concurrency. However, AsyncTask also has an alternative explicit member function called .executeOnExecutor() which lets you explicitly pick which Executor to use, including ones you have implemented yourself. If you feel confident that your app is concurrency safe, you probably want to use THREAD_POOL_EXECUTOR.
A comprehensive example of using the AsyncTask class can be found on the Android developers blog.
The example
dalvikmc.zip ZIP 1.33 MB
The example project makes use of the standard Eclipse Android Development Tools (ADT), which you will need to install following these instructions if you have not done so already. The example is designed for the tablet form factor, and mainly for landscape use (portrait works but looks weird).
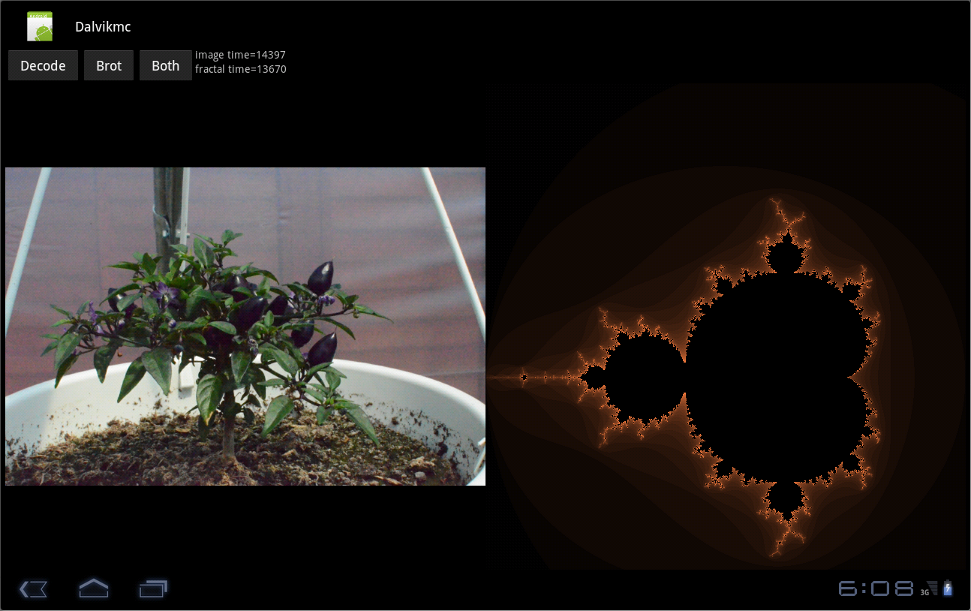
The project takes a couple of high-resolution pictures of some of plants included in the project resources and decodes them in sequence into an ImageView, displaying the real world time of the operation after the fact. A sane approach would bundle scaled images, or simply download content from the Internet, but this is an example.
In addition to this, the app also generates a pretty picture of the Mandelbrot set, into a different ImageView, logging its real world time into a different TextView.
Example overview
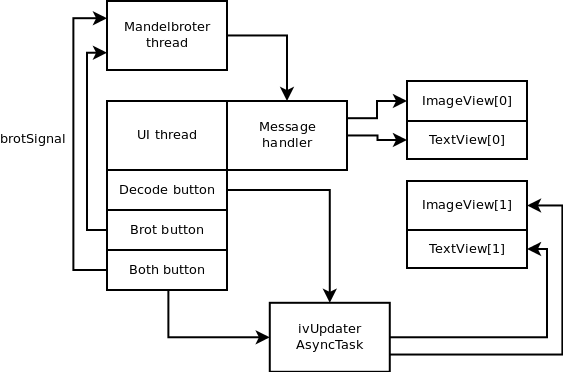
The example comes with a fairly simple RelativeLayout set up with two buttons, two TextViews and two ImageViews. One button initiates image decode, one initiates fractal generation and one initiates both things in parallel. The app consists of just one source file:
src/com.arm.android.example.dalvikmcpkg/dalvikmcact.java

- Startup
- checks how many cores are available to it, notes this number for later use, and writes it into the TextViews
- sets up a global semaphore that the app uses to prevent multiple simultaneous button presses from trying to update the same resource simultaneously
- creates a background thread for generating the Mandelbrot view
- configures
onClickListener()handlers for the buttons - one that creates an ivUpdater object that decodes an image using the AsyncTask interface
- one that increments a semaphore to instruct the background thread to update the Mandelbrot view
- one that does both of the above
Anatomy of the image decode
When image decode is requested (through one of the applicable buttons), a new ivUpdater object is created, and its .executeOnExecutor() function is called inline. We explicitly request THREAD_POOL_EXECUTOR in order that the decode can be done in parallel with other requested AsyncTasks. Note how, because we have pushed all of the processing work onto a background thread, the UI remains responsive while processing takes place.
Once we get to doInBackground(), we acquire the decodeLock semaphore, blocking other button handlers from initiating decode until we have completed our task. We then create a Bitmap object for the next resources in sequence to be decoded into and commence decode, taking timestamps before and after. We then return the resulting Bitmap.
Back on the UI thread, in onPostExecute(), we then update the ImageView, setting its content to the Bitmap recieved from doInBackGround(). We then update the TextView with the time processing took.
Anatomy of the Mandelbrot set generation
When an update of the Mandlbrot view is requested (through one of its applicable buttons), all that happens on the UI thread is that we "release" the Semaphore that the background thread is waiting on. The thread then generates a Bitmap, calculating the set as it goes, and sends it back to the message handler waiting on the main thread.

Importing, building and running the project
- Importing
- File->Import...
- General->Existing Projects into Workspace (click 'Next')
- Select archive file (click 'Browse' and select the downloaded dalvikmc.zip file)
- Projects: dalvikmc (should be ticked automatically)
- Click 'Finish'
- Building
- Right-click on the project and select "Build Project". If your Eclipse environment is set to build automatically, you might first need to clean the project (Project->Clean) to ensure a complete rebuild.
- Running
- Right-click on the project (or go to the Run menu with the "dalvikmc" project selected) and select Run as ...->Android Application. If you do not yet have a default target configured, you will likely be prompted to create a virtual device or select a connected hardware platform.
Summary
Just like it has on the desktop and in the server space, multi-core systems brings new problems but many new opportunities to the mobile space. If you are parallelizing for performance, ensure that you are actually achieving it; while introducing parallelism in your program can greatly improve performance, doing so in the wrong way (where dependencies prevent concurrency) will actually slow you down.
References
https://android-developers.blogspot.com/2010/07/multithreading-for-performance.html (also referenced above)
Java memory model
And if you are truly interested in the concept of concurrency or some more detailed information about the Java memory model (supported by Dalvik at least in Android 3.1), these resources might be of interest:
https://www.cs.umd.edu/~pugh/java/memoryModel/jsr133.pdf—the official specification of the Java memory model.
https://www.ibm.com/developerworks/java/library/j-jtp02244/index.html
https://www.ibm.com/developerworks/library/j-jtp03304/