What is video streaming and how does it work?
 Video is everywhere. With the availability of high-speed cellular networks and powerful phones, people are consuming video at an incredible pace, and all indications point to it continuing to grow. In North America, 50.1 percent of all video views are on mobile, and the percentage is even higher in Europe and Asia according to a 2017 Ooyala report. But how does video streaming work?
What Is Streaming?
Most of the content consumed on browsers or apps are downloaded over the internet from a server. For the majority of file types (html, images, fonts, scripts, etc.), the entire file is downloaded before you can watch it on a device (Yes, I know about progressive images. I’m keeping this high level, remember?). These files are generally pretty small, so the wait time to download and display on a screen is generally low.
Video files are much larger (in bytes) than images or text files. An hour-long video could easily be 700MB – 1GB. As anyone who has downloaded a large file knows, a 1GB file download can take a long time. Understandably, this is not a great option for quickly watching and consuming video content, and this is where streaming comes in to save the day.
Streaming “chops up” the big movie into smaller segments that are played one after another. Imagine a one-hour movie, chopped into smaller videos that is played sequentially:

When we chop a one-hour long, 700MB video into 10-second-long segments, we’ll have 360 files to download, each at about 2MB each. Numbering each segment is important in order to play the video back in the order it was recorded. Different streaming protocols will use different segment sizes, but segment lengths of 10s, 8s, and 2s are very common. If you are streaming a live video, you will send the video out with a delay of at least the segment size (assuming no processing time), because you have to record the length of one segment before sending it over the internet.
Video Streaming in Action
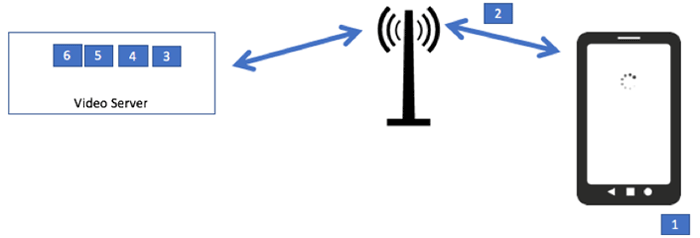
Let’s assume we are streaming a video (a movie or TV show) on demand. The server will have all of the segments ready to stream (let’s say they are 10s long), and we will establish a connection to a player (in the browser or app) to play the files. Now, we just send the movie segments over the network:

When segment one is playing, we have less than 10 seconds to deliver segment two to the device. If segment one ends before segment two arrives, we enter a stall situation. The player is ready to play video, but the video has not yet arrived.

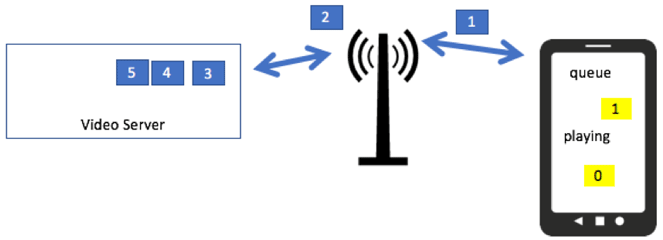
The customer gets a spinner, or a message that says something like “buffering…” That’s bad. Stalls break the continuity of the video experience, and lead to customer abandonment. We need to ensure there is enough video to playback on the device. Enter a video buffer. If we establish a buffer on the phone to hold “ready to play” segments, we can hopefully avoid running out of video on the device:

Here we have two segments (or 20s) of video stored in the buffer as segment four is being delivered.
Examining Streaming with Video Optimizer
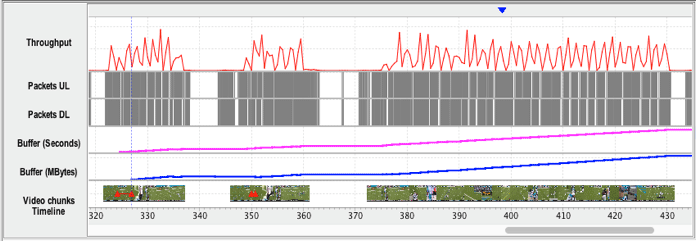
When you collect a network packet trace with Video Optimizer, it will detect the video packets and perform an analysis of your video streams (some is automated, and some requires user interaction). For example, in the screenshot below, Video Optimizer provides data on the data throughput and packet transfer (first three rows), the amount of video in the buffer (in seconds and MB), and also displays the first frame of each segment as it is downloaded.

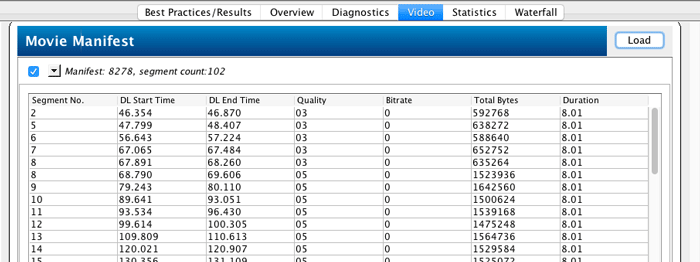
We can distill the detail on each segment further on the video tab, where it displays details about the timing, bitrate and length of each segment:

We’ve described (at a high level) how video streaming works. By breaking video into small segments, it’s possible to consume the video while it continues to download. Let’s discuss streaming video more deeply and how to use Video Optimizer to help you improve your streaming service with varying bitrates and other parameters.
How Adaptive Bitrate Can Improve Video Streaming
In short, streaming breaks videos into small segments that play one after another, allowing the video to play as it’s downloaded to the device. Playing the video while it is still downloading is a huge improvement to the customer experience, but we need to further optimize the video we deliver to our customers. Learn how you can customize content for your customer’s screen size and available network throughput. We’ll also look at how AT&T’s Video Optimizer can help you examine the video segments and how your adaptive bitrate video behaves on the network.
Screen Size: One Size Video Does Not Fit All
You’ve built a streaming service, and it’s delivering video to your customers. But are you delivering the right bitrate and dimensions of video to the customer? A video destined for a 4K TV in your living room will have 4096 x2160 pixels (8.8M pixels). However, a smartphone may only have 2560 x 1440 (Samsung S7 – 3.6M pixels).
Streaming a 4K video to the phone will force the phone’s CPU/GPU to resize each frame. Since the phone can only display 3.6M pixels, and the stream is delivering 8.8M pixels, the phone must re-render each frame, and throw away over 50 percent of the pixels in each frame to get the picture to fit properly on the screen. That not only wastes your customer’s data, but at 30 frames per second – the phone’s processors will be working overtime to do the work, leading to heavy battery drain. Your customers notice heavy battery usage because that causes the battery (and the phone) to get warm to the touch.
![]()
https://en.wikipedia.org/wiki/File:UHDV.svg
Video Throughput
Another factor to consider is that not everyone is on the same speed network. Some streaming TV viewers will be on gigabit fiber, while others will be on DSL (or even hotel Wi-Fi <shudder>). Your mobile users might be using LTE, but could also be on a slower 3G network. Sending 4K video to customers on slow connections will lead to a slow and frustrating experience.
Adaptive Bitrate to the Rescue
Adaptive bitrate occurs when multiple resolution/bitrate combinations of the same video are available for download. When a video stream is set up, a video manifest file is delivered to the player, itemizing the available streams. Like a restaurant menu, the manifest tells the player what resolutions and bitrates are available, and the player chooses an appropriate stream. If network conditions change in the middle of the stream – the player can change the version being downloaded to ensure that video continues downloading (it “adapts” the bitrate J).
Here is a list of common adaptive bitrates from a popular streaming provider (I have added the color column to simplify the figures below… and I like rainbows). We can assume the manifest tells the player that these formats of video are available:

We see that as the ID increases (and the color moves form ROY to G to BIV), the video dimensions and bitrate increase.
Adaptive Bitrate Stream Start
When the player reads the manifest, it knows the device’s screen size, but it has no understanding about the network (or network conditions). So the player will pick a video quality that is “middle of the road” to ensure the video starts playing quickly. In the example above, it might initially select level two. The player will download the first few segments at level two, and if network conditions are too slow, the player may switch to level one, but if the network speed appears to be fast – it may attempt to increase the video quality to level four or five.
We can see this occur in AT&T’s Video Optimizer Video tab. In this case, the initial quality is two (~600kbps), as the player recognized faster network conditions, it jumped to quality four (~1.5 Mbps), and then continued to play at 1.5 Mbps:

Video Segment Replacement
If you look carefully at the example above, segment one is downloaded twice: at qualities two (yellow) and four (blue). The player realized that the throughput could handle a higher quality video, and therefore upgrade it. The player had time to replace the 600 kbps (yellow) version of segment one with the 1.5 Mbps (blue) segment. This process is called segment replacement:

The player ends up discarding 288KB of data (segment one at quality two), but the user receives a higher quality video (segment one at quality four), leading to a better video experience.

Video Quality Downgrade
Unfortunately, in this trace, the network conditions were not adequate to handle video quality four. The player realizes continuing at quality four will consume the buffered video faster than it can replace it (leading to a stall). Instead, the player requests a lower quality zero for segment to keep the video playing, and to avoid a stall.
Segments seven through nine are downloaded at quality zero.

Video Optimizer collects the video on the screen at 30 frames per second. If the DRM in the application allows it, that means the video is recorded as seen on the device. In this case, we can see that at the outset, the video quality is sharp, but then the quality level drops, as seen by the jaggy and pixelated video:

However, the video never stalled, which is paramount.
Picking and Choosing Bitrates
At the outset of this post, we provided a table of selected bitrates (with the accompanying rainbow). I have no doubt that videos utilizing this schema look great on high-speed networks – bitrates from 1.5-8Mbps are well represented. However, for any network under 1.5Mbps, viewers will have just one option: 280kbps 320×240 video. Consider that many 3G connections will be below 1.5 Mbps, and you may not be serving the highest quality video to your mobile customers.
Of course, adding additional bitrates for many videos will have a large storage cost, and therefore you should apply them carefully. In this case, one option might be to remove one of the two 1.5Mbps streams, and replace it with two streams at 600kbps and 900kbps, respectively (since they add up to 1.5Mbps – the storage cost will likely be essentially the same). Now customers with cellular throughput under 1.5Mbps will receive a better streaming experience.
In general, smaller jumps in quality will allow the player to make smoother transitions between video quality levels, and makes large degradations in quality less likely (look at what Tim K said in the London webperf on images).
In addition to streaming files, adapting the quality of the stream to the device type (screen resolution and network type) ensures that it’s using the right amount of data to present the correct quality video. If network conditions change, the player can adapt the stream to suit the conditions, lowering and raising the video quality to ensure that the stream continues without stalling, but also at the highest possible quality for the device in use.
Using tools like AT&T’s Video Optimizer can help you dissect the video in your mobile application. In future posts, we’ll look into startup delays, stalls, encodings, and other streaming methods like variable bitrate.
Adaptive Bitrate: HLS Style
There are 2 major adaptive bitrate protocols: HLS and MPEG-DASH. HLS (HTTP Live Streaming) was implemented by Apple, and is currently the predominant streaming method. MPEG-DASH (Dynamic Adaptive Streaming over HTTP) is the international standard for streaming. Currently, most streams are HLS, but MPEG DASH is expected to become the main streaming solution in the coming years.
HLS Streaming: The Manifest File
When a HLS video stream is initiated, the first file to download is the manifest. This file has the extension M3U8, and provides the video player with information about the various bitrates available for streaming. It can also contain information about closed captioning and audio files (if audio is delivered separately from the video). Let’s take a look at a HLS manifest file:

Ok, so what is this file telling you? Let’s review it in sections. The first ~12 lines are breaking down the bitrates available for this video. If we look at lines 3 and 4, we see the first bitrate stream listed in the document (the first stream has an importance we will discuss later):
#EXT-X-STREAM-INF:PROGRAM-ID=1,BANDWIDTH=708416,SUBTITLES=”subtitles”,RESOLUTION=480×270,FRAME-RATE=29.97,CODECS=”avc1.77.30,mp4a.40.5″
03/playlist.m3u8
As we read across the top line, we see descriptions about this stream: the bitrate (noted in bytes – so ~ 708 KBPS), subtitles, resolution (480×270), framerate (30 frames per second) and the codecs (avc1.77.30,mp4a.40.5) in the format “video,audio”. The second line has a pointer to the manifest for this bitrate (think of this as a sub-manifest). Note the leading “03” in the sub-manifest. This is denoting the specific stream that will be played.
We could continue the analysis for each subsequent set of lines, but it might be easier to extract the data into a table:

The first column lists the leading identifier in the sub-manifest url, while the others are from the description. Examining the ID shows that the first bitrate appears out of order, and there is a good reason for this.
The Leading Segment
When a video begins playing, the player has no information about the available throughput of the network. To simplify things, HLS automatically downloads the first video quality in the manifest. If the stream provider chose to list the IDs in order, every viewer would get the lowest quality stream to start, which is not ideal. Listing the files in reverse order (highest bitrate first) would send the highest quality video to start, which might lead to long delays and abandonment on slower networks. For this reason, streaming providers typically balance startup speed and video quality by picking a “middle of the road” starting stream.
Additional Manifest Data
The manifest also has information with links to the subtitles available (and if they should be turned on by default), and the languages available. In this case, the language is “en” (English).
Sub-Manifest
When the player requests quality 3 – there is a link to a second manifest file: “03/playlist.m3u8” This file lists the segments of video = (and the urls for these segments):

In HLS, files with the extension .ts are the video segments. This manifest is providing the next six segments to download at quality three. If we look at the segment names, they are in the format “date” T “time.” The first segment is 20170921T205231392, suggesting September 21, 2017 at 8:52:31.392 PM. Since I know when I captured this data, I know that the time is reported in GMT.
Closed Captioning Manifest
In the main manifest, there was also a m3u8 file for closed captioning. The file looks similar to the other sub-manifest file, but it points to a list of “.vtt” files – the format used for closed captioning.
Video Download and Playback
The main manifest points the player to sub-manifest files that subsequently direct to the files required to play the video. The player downloads the files required, and the video starts playing.
Simultaneously, the player monitors the observed throughput of the network. If the measured throughput shows an opportunity to increase the video quality (or in the opposite case – there is a need to decrease the quality to continue the stream), the player may request another “sub-manifest” for a different stream quality. The player requests the new m3u8 “sub-manifest” and begins streaming at the new quality level.
Putting it All Together
Let’s walk through this example using Video Optimizer. I began by collecting a network trace of a popular video streaming application. When I opened the trace, Video Optimizer automatically identified each video segment, and listed them in the Video tab (if this does not automatically occur, we have a Video Parsing Wizard that can help):

This table displays which video files were downloaded for the manifest in question. This was a live stream, and while segment two was downloaded, playback actually began at #5. Segment five was downloaded at quality three (as directed by the manifest file shown above). Segment eight was downloaded at quality three, but also at quality five. At this point, the player had measured the network throughput, and decided that it could increase the video quality for the viewer. We can see the video continued at quality five for the rest of the stream.
To find the manifest files in the trace, we need to look at the connections around the time the video started downloading (around 46s) for the initial M3u8 files. If we look around 68s, we discover the quality five sub-manifest. Switching to the diagnostic tab, I look for TCP connections around 46s that use a lot of data (since video files use a lot of data☺️).

Focusing on the Byte Count row, I see TCP flows transferring ~176KB and ~1.25 MB. I’ve obfuscated the IP addresses and domain names, but I immediately rule out the 176KB connection, because the domain contains an images subdomain. When I look at the files transferred, they are image files. The connection with 1.25MB of transferred data contains the manifest and video files, as seen in the request/response view:

In the yellow box, you can see that the files requested are m3u8 manifest files (latest.m3u8 and playlist.m3u8), and the responses are small – typical of a small text file.
In the green box, these files are much larger: these are the video segments beginning to download.
That’s how Video Optimizer can help you dissect video streaming quality in your app.
